SHE’S HERE

Well everyone she is finally here,  has arrived, all on her own in her perfect timing. She was born Tuesday June 21, weighed in at 7lbs. 6oz and 20 inches long. We are all home now and doing great. Thanks for all the kind words and prayers, they were definitely felt. I will post pictures soon I promise. and now for a nap…………..

Donya

Wrapped up in my love

They are talking about me at CraftGossip.com

So this is it. Come Thursday (if not before….Lord how I wish it would be before) I will be holding my brand new baby girl. It has been a long road coming and I will not lie, I am really glad t is about to be over. With The Elder A I never made it this far in the pregnancy, I was induced at 35 weeks due to preeclampsia so this gigantic, miserably uncomfortable stage it new to me…..and not at all fun I must say. But the end result will be worth it when I get to see this face in person.

One of the last things I have made for is a prop for some of her newborn pictures(that we are doing ourselves, Heaven help us). I have seen these little cocoon type things all over Etsy and fancy shmancy baby boutiques ranging from $30-75 to which I say “Oh nay nay, I can make this.” So here is how I used the fabulousness that is Ruffle Fabric and made my own version of an infant cocoon.

This one would run you $68

This one would cost you $50

I started with one of those little swaddle wraps to get the general dimensions. I basically traced around it on freezer paper and used that as my pattern. It ended up being about 20 1/4″ long and 10″ wide, at the widest part, ie the bottom. Easy enough.

Swaddle blanket I used as my template

Cocoon pattern, basically a rounded off tube

Next I took my Ruffle Fabric, you prob need no more than 1/2 yard and cut out the shape from my pattern. Now here comes the hard part….turn the 2 pieces right sides together and sew them up around the sides and bottom. I know….mind blowingly complex but just breathe and you can work through it. Then I turned the top under to make it nice and neat and sewed a tiny topstitch around the top. And that’s it.

Oh how I love ruffles

The finished cocoon

As you can see this is clearly not . I tested it out with one of The Elder A’s baby dolls to see what it might look like. Pretty cute I think. Just imagine a pudgy little newborn face tucked down inside all those ruffle with a sweet little flower in her hair. Can’t wait (so why don’t you come on out now sweet girl and we can play…..eeemmmK)

Testing it on a baby doll

The great thing about this Ruffle Fabric is that if this cocoon ends up a little long all you have to do is fold it under some more and the edge is still nice and finished, even without sewing. I will say this, be sure as you sew it that all the ruffles are laying flat, in the same direction. Otherwise you will sew some up and some down and they will not look good.

I will be sure to post the results of out photo session with this. I am going to make The Elder A a dress out of the rest of the fabric…..someday. Keep me in your thoughts and prayers come Thursday and if you feel so inclined send me any “baby having vibes” you can muster between now and then. Take care all and I will be back soon. Keep it stitchin’

Donya

The Girl Creative

Sumo's Sweet Stuff

Todays Creative Blog


Tip Junkie handmade projects

Photobucket

Sewing for Sisters Day 5 Guest post from no big dill

I could not be more thrilled to have Katy from no big dill here today to wrap up our week-long celebration of sisters. I hope you have enjoyed this week, I certainly have. Sometime in our crazy lives we forget how important family and loved ones are. I think the bond of sisters is one that cannot be compared to any other friendship/relationship. I can’t wait for my 2 girls to grow up together, love each other, protect each other and share what my sister and I have. That unspoken, unbreakable bond only your sister can understand. So thank you for sharing this week with me and stay tuned for news about arrival.

Hello Keeps Me in Stitches readers!  How exciting that Donya will soon be holding her second little girl, right?!  I was pleased that she asked if I would write a post on sisters, because that’s one thing I have a heavy dose of in my life.  

I have 3 sisters myself, all of us so different than each other, but our buffet of variation lends itself to being satiated, that we can appreciate each other for who we are and learn from other’s strengths.  Ann (on the far left) has shown great courage as their first was born with Cystic Fibrosis.  She navigates life with a huge amount of faith I admire and respect.  Ashley (the oldest, in yellow) is one of the most level headed, lowest maintenance people I know.  Jordan (on the far right) loves adventure and the romance of life, and is always making good things happen.

 So, when I had my second daughter, you’d think I would be well aware of the possibility that my two girls would not be clones.  My naivete would soon burst as I discovered that every single addition of our girls would give a new spin on our growing family.  They all had different personalities!  Imagine that.

 We deal with frustrations every single day, but I am trying (oh, how I’m trying!) to appreciate that each of these souls comes as unique as the varieties of flowers on the earth.  They are all beautiful, each adds a pop of color that is sometimes complimented by another and sometimes clashes.  I love it when Clover (the youngest) will say to me, Let’s go pick up my sisters!  I have learned that they each need something different from me.  One just needs me to show excitement about her adventures of the day, another needs me to cuddle with her, and yet another just needs me to involve her in my projects and interests.

It’s all a delicate balancing act that I fail at frequently, but in showing them that I respect them, they in turn show respect to each other.  I ask for forgiveness every single day and pray and hope (and pray some more) that they will turn out to be loving and caring toward each other despite my clumsiness at navigating motherhood.  Some days I see glimpses of the great women they will be, and it gives me hope and appreciation for them.

As far as dressing them?  When I sew for them I don’t like the matchy-matchy dress look, or sewing up the same thing times 5.  I like to choose a few colors and coordinate those instead of using the exact same fabric and pattern for all of them.  For a casual look, I don’t mind them dressing the same.  In fact I think it’s rather endearing when they all emerge from the bedroom in their jeans and matching t-shirts, proud of themselves for some semblance of cooperation among the ranks.  (Plus, it allows their different personalities to shine.)

And when my number 6 makes a debut, whether it be a boy or girl, I am confident that this new little one will be loved fully by his/her sisters.

Thank you so much, Donya for having me here!  Your little girls will be blessed to have each other.

no big dill

Sewing for Sisters Day 4

So today we talk a little more about sewing. When we found out we were having another girl I was shocked to say the least. This pregnancy has been nothing like my first, from day one. This time I was tremendously sick, craved all kinds of weird, very unhealthy things and just felt quite different. However, having another will have its upside in that I can reuse all the fun things I have made The Elder A over the years and I have all the more reason to expand my sewing skills since they will be well used on 2 girls.

There is one problem though having them this far apart, 3 ½ years, not many patterns stretch from Newborn to 3T. Most only go from Newborn to 2T and then others start at 3 and go to 7 or 8. So making all those adorable matching outfits has been a challenge. I did find one pattern from oliver + s that I love. Yes I had to buy 2 separate patterns but it was too cute to pass up.

So in wracking my brain to figure out what to make I thought…duh preggers….pillowcase dresses. There is no size limit on those and they will be perfect for this ruthless Alabama heat. So I set out to make matching dresses and here is how I did it. It isn’t very scientific or very precise, I just kind of took measurements from The Elder A and quesstimated (that’s a technical term) what might be so fingers crossed hers fits.

Sew Sisterly Pillowcase Dress

What you will need:

A couple of yards matching fabric for the main piece, depending on your chosen sizes.

A yard or 2 of a coordinating fabric if you chose to do a bottom band, as I did.

Matching thread

Bias tape, if you do not want to make your own

A sleeveless dress that fits well for the armhole cut outs

Ribbon for the ties unless you chose to make them out of one of your fabrics

So here we go.

Take some basic measurements, if you can, of the child the dress will be for. For The Elder A I measured from her high shoulder down to where the dress should end. I will say for her I did a pillowcase top rather than dress because she has TONS of dresses, but anywho. Then if you are doing a main piece and bottom band decide how wide you want the bottom band, subtract that from the total length and there you have your 2 pieces. The great thing about this type dress is you don’t have to be 100% precise. On my dresses I had my bottom band be folded over on itself so my measurement for it was doubled but you don’t have to do that if you want it as a single layer.

Don’t forget to factor in seam allowance (I  used ½”) and enough to fold over the top of the dress to form a casing for the ribbon ties (I used 1”).

Then cut your pieces ON THE FOLD. Doing this makes you have only one side seam, so so easy. I made mine about 16” wide by the length I figured for each girl (so basically 10 ¾”x 16” for as an example) The wider it is the fuller it will be so again that is all in personal preference. After trying hers on The Elder A needed to be taken in on the sides a bit, since it was more of a top so it could have been more like 13” wide, it was just too full for a top at 16”.

Cut parts for one dress

Now take your main dress piece and with right sides together sew up the one side seam and finish the edge. If you have serger it makes quick work of this.

Now take your bottom band, if you chose to use one, and with right sides together sew it into a circle at the short ends. Press that seam open and then fold it in half, WRONG sides together, and press again.

Bottom band sewn and folded in half

Then line up the raw edges to the main dress piece, right sides to together, matching side seams and sew and finish that edge. Now you have the workings of a full dress, turn it right sides out.

Bottom band and main dress pined right sides together

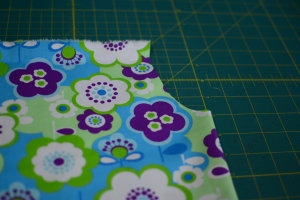
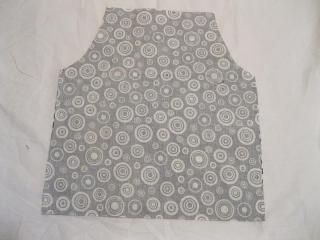
Now the toughest part, which isn’t hard at all….cutting the arm holes. Take a sleeveless top or dress, that fits well, and fold it in half at the arm hole. Lay that arm hole opening over the dress square at the top edge. Using a fabric pen draw the cutout of the arm hole onto the dress and cut. It is basically a curve that is wider at the top than bottom. There are several places online you can find to download armhole patterns but they never seemed to fit The Elder A right, they were always too large. The general rule I have found is 1.5 inches to 2 inches measured in from each side, and 3 inches to 4 inches curved down.

Armhole cutout

Now be careful here if you used a serger because you just cut into your serged seam and if you pull too much it might start to come unraveled. I go back and do a small straight stitch at the top of each armhole just to reinforce it.

Now take either your purchased bias or bias you made had cover the raw edges of the arm hole. Making bias is super easy. The hardest part is cutting on the bias if you ask me, that and not burning your fingers when you iron it. The Prudent Baby has a great tutorial on it, as does Dana from made. Check them out if you want to learn to make your own. Be careful here not to stretch the bias tape or the dress out of shape as you sew the bias on. I have made many a whanky armhole by pulling in the dress while I sewed the tape down (bad Donya, I know).

Bias tape covering raw edges of armhole

Now that you have the dress cut, sewn and armholes bound time to make a casing. Again if you have a serger with a coverstitch, use it to make an appropriate size casing. (I swear that one stitch on my serger was worth every penny) otherwise just finish the raw edge at the top of the dress, fold down enough room for your chosen ties and sew.

Casing for ribbon ties

Last thing, run the ribbon, rick rack, fabric ties whatever you chose through the casing and gather the dress to the needed size. Again if you have the child you are making this for around put it on them and fit it to them BUT if they are being stubborn and refuse to be born, just estimate it. Here is something I have found is a MUST do. Once you know how much to gather the dress, pin the ties to the dress and SEW THEM DOWN. This saves two things, one being the ties will not get lost in the washer….never to be seen again and two you little one can’t pull a Houdini and undress herself by simply pulling a tie loose and out of its casing.

For the ties I like to have an older girl with a tie on each shoulder, meaning I need 2 ties of equal length that will meet on the shoulders. For babies and younger girls I just do one long tie and run it though both front and back sides of the dress and tie on one side. I have found younger ones, mine at least, rarely stay still long enough to tie one, much less 2 ties.

And there you have it, matching pillowcase dresses. So simple right?!?! I can’t wait for to get here so I can try it on her and they can be all matchy sisterly cute. I will post pics of them wearing these as soon as this immovable child decides she wants to meet the world. Seriously send me baby having vibes….please…I’m so hot and whale like.

So tomorrow I have an awesome Mom who knows all about having little girls because she has 5 OF THEM….yes 5. Katy from no big dill is going to guest blog for me to end Sewing for Sisters week. I am so pumped!!! She is such an inspiration and her daughters have the coolest names. I can’t wait for everyone to read her post so come back tomorrow for our last day of the series. Thanks everyone and Keep it Stitchin’

Donya

”Photobucket”

UndertheTableandDreaming

Sewing for Sisters Day 3

A break from sewing……

Sibling Photo Inspiration

So today let’s take a step back from the needle and talk about some ideas and inspiration to photograph all these awesome projects we all work so hard on. As you can tell from this post, I like to pretend I know how to use my camera shooting in manual mode. I took a class from my fabulous friend of Click Workshops and she taught me the basics so now I just try not to mess up her fine education.

With A² due any day now I have been wasting hours of time scouring obsessed with Pinterest and finding inspiration for newborn and sibling photo session ideas. Whatever evil genius came up with Pinterest needs to report to my house to tackle the mounds of dirty dishes and laundry piling up due to neglect. The site is so so addicting….worse than Facebook, and that’s saying something people. If you want to follow my boards my Pinterest name is donyarumore (much like my actual name) I would love to follow you in return.

This is a maternity pic my fab friend took for us. See she loves her baby sister already

So this is what I have come up with so far for the sibling poses. I don’t want the same ones you see all the time with big sister kissing the baby or holding the baby….blah blah.

Mila's Daydream by Adele Enerson

I ADORE what Adele Enerson of Mila’s Daydreams has done with these pictures of her sleeping baby girl. She would design these amazing scenes around her sleeping baby, snap some pictures and in the process made newborn photo history. I think I might take inspiration from this photo and have sleeping and The Elder A pretending to style her hair. This would be the most ambitious photo but if we could pull it off it would be really memorable.

There are not words for how much I love this picture

This one I just love. It literally melts my heart. I love the angle, how the older child isn’t really looking at the baby or the camera. It is just a spit second moment of pure love caught on film. You can almost see the older child promising to love and protect her baby sister without the kissy kissy mush in so many new baby photos. This is real people.

so creative

Ok so I know this wouldn’t be for many years to come but can we just stop and admire this for a moment……..
The Elder A has an obsession with having long hair (thanks Disney) so I imagine she will never want to cut it and since little sisters often want nothing more than to be like big sister I will probably have to very long haired little girls. Lucky for me this just might be possible in a few years.

Look at all those ruffles

I am totally infatuated with the idea of a newborn in a doll bed, and come one……what Mom of little girls doesn’t love an over abundance of ruffles every now and then? I would change this up to have The Elder A maybe reading a book to her baby sister or doing the “shush” finger on lips pose over the baby. Plus since I need another reason to order enormous amounts of Ruffle Fabric, this will fit the bill nicely.

So what do you think bloggy buddies? Do you have any inspiration you want to share? I would love to hear ideas, comments, anything.

We will be taking these photos ourselves (pray for me now) since my above mentioned fab friend is also with child and will just not be able to do it. (sad face) So now if this baby would, in the words of The Elder A “get here already” we can put some of these ideas to use.

See why I'm bummed she can't take our pictures....she is amazing

I will post our results, hopefully good ones when we get them edited and prettified. Tomorrow I will show off matching dresses and has anyone guessed my special Friday blogger?!?! It is going to be a not to miss for sure!! Thanks everyone and Happy Stitching.

Donya

Sewing for Sister Day 2

Today’s project is for sisters young and old. Be forewarned, this is so easy you might just be overwhelmed with a desire to make dozens of these and get lost in terry cloth and beach towels.

The Beach Blanket Bingo Towel

This project was inspired by my baby sister and her love/hate relationship with…..a beach towel. You see my sister and me too for that matter, LOVE to lounge by the pool or the ocean whenever possible. It is one of the few ways to stay cool here in Alabama.

Me and my younger sister.

But what always happens? You get to the pool, scope out the perfect chair, lay your towel on it and less than 10 seconds later it is blowing away, falling off the back or simply wadded up into a terry cloth ball in the seat of the lounge chair.

You have all seen the solution. These towels with the flap/pocket on the back that range on the World Wide Web from $20-70 dollars. Sorry my friends but I refuse to spend that much money on something that literally cost pennies to make. So make one I did….with pockets. So take that Land’s End.

Ridiculously expensive beach towel with back pocket.

This project is so simple and fast it took me all of 20 minutes and less than $5. That’s right…..5 BUCKS. I waited until my local fabric store had the terry cloth on sale and all you need is ½ yard for a regular size beach towel.

Beach towel and 1/2 yard of matching terry cloth fabric

So here goes.

First lay out your non-pocketed beach towel and measure its width. Then decided how deep you want you pocket to be. Most of the ones I found online were between 10” and 20” so I chose the happy medium of 15”. So for me my new pocket was 30×16, because I added the extra inch to turn the bottom hem up.

First turn the bottom edge to up ½” and then over again ½”. You can use a serger here for a rolled hem, or just turn it over once. I chose to do the double fold to add some weight to the bottom edge so as not to “snag” it on the back of any chair that might have sharp corners or rough edges. Hew the bottom edge for a nice finished look.

Finished hem of back pocket

Then it is as simple as putting right sides together and sewing along the side, across the top and down the other side. Obviously you wont sew  the bottom because that is what becomes your pocket. Clip the corners and turn it out and there you have a pocket back beach towel.

New back pocket pinned, right sides together, to original towel

Newly finished pocket towel

But why stop there? You will likely have enough terry cloth left to make a side pocket to hold sunscreen, phones…whatever. Here is how I did mine. I literally took the leftover terry cloth, cut one about 1” shorter than the other and did the same hem technique on the shorter piece only this time it was the top side. I then placed right sides together and sewed up the 2 sides. Now I am left with one huge pocket. I then got some things I usually have with me by the pool, sunscreen (a must people, every time you go in the sun. Skin cancer is no joke) my cell phone and a bottled water. I laid them on the new pocket and roughly drew some lines to create 3 smaller pockets. Sew a straight stitch along these lines and viola, you have a 3 opening side pocket for your towel. Now all you need to is sew it, right sides together to the towel and presto…a neat place to keep your most used pool items. (Be sure to sew the pocket onto the towel so the openings are facing up, don’t laugh I might have learned this one the hard way)

Side pocket

Now you can be the envy of the pool and know that you paid less than the price of your fancy umbrella drink for it. I hope my sister enjoys her new towel….if she ever gets it….I might keep it for myself.  But hey these are so easy to make everyone in the family can have one. Come back tomorrow when we take a step away from the sewing machine to look at some sister photo inspirations and delve into my Pinterest obsession. (It is really bad folks, hours have been lost to that evil genius of a website). Hope you enjoyed this super fast and easy summer tutorial. Happy Sewing and see you tomorrow.

Sorry for the lack of pictures of the finished towel. My camera has gone a bit nuts and needs to be looked at…hopefully it is just overworked and needs a nap. Also I found then using a “stronger” needle on this project works better….meaning I used a 90/14 sharp instead of my usual 75/11 ballpoint. All those layers of terry cloth need a more substantial needle to get through them. 

Donya

Todays Creative Blog

Anything Related
Tip Junkie handmade projects

Sewing for Sisters Day 1

As promised this week I am going to be doing a series of posts called Sewing for Sisters. Ok well they aren’t all going to be sewing related but most are. This is to celebrate the beauty that is sisterhood. I myself have a younger sister and our second daughter is due to arrive any day now. So I thought what better way to honor the unique relationship of sisters than to devote a week to our partners in crime. Here is the first installment of the series. I hope you enjoy it and check back tomorrow for another fun project.

Sweet Sister Totes

 As you know I live in the hot hot South. We Southerners have some customs and traditions that are unique to us when it comes to new baby arrivals. We hang decorated wreaths on hospital doors to announce the arrival, height, weight, sex and often name of the new babies. We put large ribbons on our mailboxes when we get home to let our neighbors know our new bundle of joy has arrived. And when it comes to siblings we make a BIG TO-DO over bringing home a new baby. Moms and Dads often arrange for siblings to “give” each other gifts to celebrate the occasion.

 So in honor of my little one, due to arrive literally any minute now, (sooner rather than later I hope, it’s blazin’ hot) I decided my girls would give each other new custom tote bags full of little treasures. They can use these for years to come at the library, park, museum, going to Grandmother’s house…..anywhere and they will always know this is the first thing they gave each other as new sisters.

 So without further rambling here is how to make these Sweet Sister Totes for you own little clan.

 So I had like 3 yards of this soft linen in my fabric stash for who knows what reason. (OK I admit I hoard fabric, don’t judge). The Elder A loves the color red so that was an easy choice for the lining of her tote and I let her decide that would like to have green for hers.

 I made these in 2 different sizes, one slightly larger than the other. The totes are fully lined with boxed corners, piped trim and cute appliquéd fronts. So let’s get started.

 First I cut the 4 pieces for each tote, 2 outer and 2 lining, making 8 total since I was making 2.

The Elder A’s was 16×14 and was 14×12. This includes seam allowance (1/2″) on all 4 sides, don’t forget that part.

 I also cut handles from the lining fabric. The Elder A’s was 20” and was 18”. Cut 2 of each of those.

 If you are doing an appliqué now is the time. Take one of you outer pieces and place the design in the center before beginning any construction. (No I do not have some awesome machine that let’s me know will have brown hair and blue eyes….just a Mother’s gut feeling)

Designs from Planet Appliqué.

Now take the 2 outer pieces, right sides together and sew along the sides and bottom, NOT across the top. Do the same thing with the lining pieces BUT leave a 2” opening at the bottom of the lining so you can turn the bag later.

 Now for my bags I added a 3” trim piece that I piped to the front pieces BEFORE I sewed them together in the above step, but that is totally optional. This is how they looked.

Piped and trimmed edge

 Now to box the corners. If you Google boxed corner tote, or any variation there of, you could spend days sifting through the how-to sites and videos. This is basically how I did it and they turned out really nice. All you do it line up the side seams with the bottom seam, at the corner making a triangle. Then it is up to you how “deep” you want the box corner to be. I personally used 1 ½” but you could use more or less. Using you ruler measure down from the top point of the triangle and draw a straight line across, creating the bottom edge of the triangle and then sew a straight stitch across that line. Cut off the excess, aka the triangle itself, and there you have it…a beautiful boxed corner.

Boxed corner

 Do this on both the outer and lining pieces 2 corners. Double check that you are measuring the same distance on all 4 corners. Once that is finished it is time to assemble the bag.

Turn the lining right side out and slide in down into the bag that is wrong side out, placing right sides together. Stitch all around the top edge and then carefully pull the outer bag through the hole you left in the bottom of the lining. Sew up the lining hole and then push the lining back down into the bag. There you have the base for you tote.

Lining inside bag, right sides together

Bag before straps

 Now on to the straps.

These can be done with ribbon, rope, twill tape…whatever. I chose to use the lining fabric and make my own. The 2 pieces are 3” wide and can be any given length long. To sew the straps is a lot like making bias tape, another subject you could spend days on Google reading about. Take each strap piece and turn the short ends, to the wrong side ¼” and press well. Beware of burning your fingers. Then take the strap pieces and fold in half length wise, WRONG sides together and press well. You should get a long skinny tube that looks like this. Now topstitch all the way around, all 4 sides for both straps.

Strap with topstitch sewn all around

 Now to attach the straps to the bag I measure over 2” from the side seams and placed my straps there. Sew one end down and then measure from the other side and sew the other end down. Be carefully not to twist the straps. Repeat for the back and you are DONE!!

Strap sewn to bag along top edge

 Look how cute and special these are. I can’t wait for The Elder A to give her baby sister this special gift and be surprised when baby sister gives her bag back to her full of her favorite things.

I cannot take credit for the appliqué design. I bought these from Becca at Planet Appliqué. She is utterly fabulous and has hundreds of adorable designs and runs GREAT monthly specials. Sometimes the designs are as cheap as 99¢ each. Go check out her site.

 Tomorrow on Sewing for Sisters I will be doing a super quick and easy project to tame those crazy beach towels from falling off the back of lounge chairs. Stay tuned this week because on Friday I have a very special guest planned who knows more about sister than anyone I know. You won’t want to miss her guest post. Happy Sewing. See ya tomorrow.

Donya


Sumo's Sweet Stuff


Beneath the Rowan Tree

Ring Around the Ribbon top

I hope everyone enjoyed the visit from Amy at Nap Time Crafters. Isn’t she just amazing?!?! Go give her some bloggy hugs for sharing a playdate with us.

So today’s show is brought to you by Rapidly Growing Children Miracle Growth Tonic.

Do your little ones ever have a shirt that is just a bit too short, mainly because they grow over night by like 3 inches and even though it fit YESTERDAY somehow, today….not so much? Well mine does all the time it seems and since I am not a fan of the Dora shirt too short look I figured out a super simple, fun way to lengthen an otherwise perfectly good shirt.

 So this one is sooooo sooooo sooooo easy and a great ribbon stash buster.

Take the too short shirt and decide how much longer it needs to be. For me it was only a couple inches so I settled on adding a total of about 3 inches in case The Elder A decided to do more of that overnight growing thing.

Mysteriously outgrown shirt

Next pick your color scheme with 3-4 different types/colors of ribbon. It helps if they are all the same width but they don’t have to be. Measure across the bottom of the shirt, to determine how many ribbon across you will need front and back and then, based on the number and width of your ribbons cut them to the desired extra length you are adding (plus seam allowance).

Decided color scheme

So mine look like this, pile of ribbon, all cut 5 inches long. I cut some extra just in case and plus there was just a bit left on each roll anyway. Fold them all in half and since we all know ribbon likes to fray you will need to seal the ends off somehow. I used my serger and just kept feeding them in a long line until I had them all sewn up. If you don’t have a serger just use a wide zig-zap stitch over the tops. You can also use something like Fray-Check but I personally am not a big fan of that stuff, it never fails to leave an oily stain on something.

Pile of ribbon

Cut 5 inches long

Serging the tops.

Pretty little ribbons all in a row

Ok so now just pin the ribbon to the wrong/underside of your shirt and sew them on. I used the stitch line that was already on the shirt to “hide” the new seam where I was attaching the ribbons. The trick is to only do a few at a time, lining them up side by side carefully. If you try to do the whole shirt all at once you will likely be off because the ribbons will shift and move on you as you sew the others on.

Pinned and ready to sew

Hiding the new seam line

See…I warned you about the shifting

Go all the way around and…..

Finished!! I have no idea why she is holding her shoulders like that. She said she was posing….who knows

That’s it!!! Done! See told ya easy as pie. (beware random rambling….)BTW where did that come from? Have you ever made a pie, from scratch? It is not in fact easy. (rambling ended)

 I also added a tiny color coordinating ribbon at the top, just for fun. You could do a ribbon bow or an appliqué or nothing at all.

 This top will also fulfill any garment twirling requirements your daughter might have on her clothing at the moment. Oh that’s just mine…huh well lucky you then.

It TWIRLS!!!!

Ready…..

set…..

ADORABLE!!

So there you go, a quick easy fix to the weed like growth spurts our kids go through.

I hope you all are having a great summer, we are sweltering here in Alabama but what else is new? Oh wait I know!!! Get excited because next week I am going to do a new series, Sewing for Sisters. This is going to be in honor of my new little girl dropping in to the world at any moment. I am going to have an awesome guest post from a woman who knows a thing or 2 about raising sisters. Wanta guess who she is? Stay tuned more to come in a few days. Happy Sewing

Where shall we link to today

Transformation Thursday

Somewhat Simple
make it wear it
 

Donya


Guest post by Amy @ Nap Time Crafters

I think Amy from Nap Time Crafters is such an inspiration. She has amazing tutorials and even hosts major sewing contests like American Crafter. I am thrilled she agreed to blog swap with little olé me.  So without further ado check out her adorable top for her even more adorable baby girl. Take it away Amy.
>>>>>>>>>>>>>>>>>>>>>>>>>>>>>>>>>>>>>>>>>>>>>>>>>>>>>>>>>>>>>>>>>>>>>>>>>>>>>>>>>>>>>>>>>>>>>>>>>>>>>>>>>>>>>>>>>>>
Hi I’m Amy from Nap Time Crafters🙂 I’m a SAHM mom with 1 little girl- she’s almost 18 mos. now. Can’te believe how time has flown by! I hope you’ll swing by my blog for some fun Tutorials, the Friday Favs Party and a Giveaway every Saturday!
I’m so happy to be here today- I LOVE blog swaps! Donya is super talented and I love all of the cute things she makes! Today I have the Anchors Away Tee to share with you:)
Summer is just around the corner! This little tee is super lightweight, easy to sew, and has just a bit of nautical flair!
Ahoy!
Nice and breezy and perfect for play!
Perfect for picking flowers
And just roaming around
Ready to make one? I’m thinking I’ll make one for myself next! This pattern is great for any age!

Materials:
  • Lightweight cotton: I used 1/3″ yard for an 18 mos size
  • Scrap of contrast fabric
  • 1/4″ elastic
  • Double sided fusible interfacing
1. Cut out your pieces. I used a shirt in a similar style as a guide. This shirt is gathered (by the elastic) so make   it quite a big bigger than your usual shirt. My armholes ended up slightly snug- make sure you make the sleeves and armholes really roomy. My sleeves are cut on the fold along the outer straight edge. 

 2. With right sides together sew 1″ in along the  bottom edge starting on the left.

 3. With right sides together sew up you side seams

 4. Fold the bottom edge of your sleeve over twice to form a casing. Stitch most of the way around- thread your elastic through and then sew up the gap you left. Make sure the sleeves aren’t too snug- babies and toddlers have bigger arms than you’d think:)

 5. With right sides together sew your sleeves into the shirt. Make sure you line your seams.

6. Fold the top edge of your shirt and sleeves over twice and stitch to form a casing- leave a small gap. Thread your elastic through and tighten the elastic enough to form a neckline. Secure the elastic and stitch your gap shut.

 7. Hem the bottom of the shirt. I used my double needle, which gave me a really clean professional look.

 8. I just discovered how to use my cricut on fabric!! Couldn’t be more thrilled:) Take your double sided interfacing and fuse to the WRONG side of your fabric. Smooth onto your cricut mat with the fabric facing down. Mine cut out perfectly using 2 for speed (low), 4 for pressure (high) and 5 for the blade depth. I know the silhouette sells special interfacing to use with their machine, but you might just try your run of the mill wonder under first.

 9. Peel of the backing and iron your applique to the shirt. I had my anchor over on the side and part of it wraps arounds to the back. Use a zig zag stitch to go all the way around the applique and keep it secure.

Anchors Away!

I am THAT Mom

So if there were ever any doubt, it is official, I am “THAT” Mom. You know the Mom that tries, and often fails, at overachieving and doing everything humanly possible for herself and her kids. I have made all of bedding, her coming home dress, custom hospital gowns for myself and more than enough Big Sis t-shirts for The Elder A.

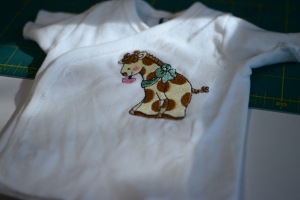
So I should have been happy stopping there, yes? Of course not. The other day as I cleaned up my studio (which I should post pics of soon, anywho) I found a stack of those little button Newborn tees that babies wear in the hospital and basically until the cord stump falls off. I have no idea where they cam from but of course they were just BEGGING to be customized. So….yea….more custom stuff for the hospital stay. See “THAT” Mom.

Custom Newborn tee
Another custom tee.

The giraffe thing was started by The Elder A, she has tons and tons of stuffed monkeys and she decided her baby sister should have giraffes as her “thing”. So that explains that.

Oh and why should the kiddos have all the fun?!? Just for good measure Mom and Dad get custom pillow cases, so no one confuses our awesome foam pillows with those things hospitals claim as pillows.

Mommy and Daddy get some swag too!!

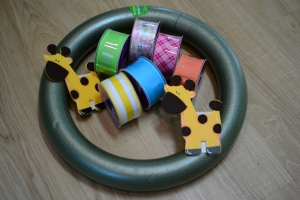
Annnnnnnnnnddd, (this may be a Southern thing but) when a baby is born in the hospital we hang a wreath on the door, gender specific and usually with a name and birth details (weight, height, time…..) So of course I am making one of those too, a ribbon wreath with little giraffes (tutorial to come later). Someone save me from myself……please.

Ribbon wreath supplies

Donya